Section 6: Navigating the Roads
Traffic Lanes
A traffic lane is a section of road for a single line of traffic.
Lane Markings
Lane markings on road surfaces help drivers know which part of the road to use and understand traffic rules.
Single Solid Yellow Line
A single solid yellow line marks the center of a road with two-way traffic. Do not pass a vehicle in front of you if there is only one lane of traffic going your direction and a solid yellow line on your side of the road.
Double Solid Yellow Lines
Do not pass over double solid yellow lines. Stay to the right of these lines unless you are:

- In a high-occupancy vehicle (HOV) carpool lane that has a designated entrance on the left.
- Instructed by construction or other signs to drive on the other side of the road because your side is closed or blocked.
- Turning left across a single set of double yellow lines to enter or exit a driveway or private road or make a U-turn.
Two sets of solid double yellow lines spaced two or more feet apart are considered a barrier. Do not drive on or over this barrier, make a left turn, or make a U-turn across it, except at designated openings.
Broken Yellow Line
A broken yellow line indicates you may pass if the broken line is next to your driving lane. Only pass when it is safe.
Single Solid White Line
A single solid white line marks traffic lanes going in the same direction. This includes one-way streets.
Double Solid White Lines
Double solid white lines indicate a lane barrier between a regular use and a preferential use lane, such as a carpool (HOV) lane. You may also see double solid white lines in or near freeway on and off ramps. Never change lanes over double solid white lines. Wait until you see a single broken white line.
Broken White Lines
Broken white lines separate traffic lanes on roads with two or more lanes in the same direction.

End of Lane Markings
Ending freeway and street lanes are usually marked with large broken lines. If you are driving in a lane marked with broken lines, be prepared to exit the freeway or for the lane to end. Look for a sign that tells you to exit or merge.
Yield Line
A yield line is a line of solid white triangles that shows approaching vehicles where to yield or stop. The triangles point towards approaching vehicles.
Choosing a Lane
Traffic lanes are often referred to by number. The left (or fast) lane is called the Number 1 Lane. The lane to the right of the Number 1 Lane is called the Number 2 Lane. Then the Number 3 Lane, etc.
Here are some tips for choosing a lane:
- Use the left lane to pass or turn left.
- Use the right lane to enter or exit traffic or when you enter the road from a curb or shoulder.
Changing Lanes
Before you change lanes:
- Signal.
- Check your mirrors.
- Check traffic behind and beside you.
- Look over your shoulder in the direction you plan to move to make sure the lane is clear.
- Check your blind spots for other vehicles, motorcyclists, and bicyclists. Do not let the vehicle drift into another lane.
- Be sure there is enough space for your vehicle in the next lane. It is not necessary to slow down before a lane change.
Stay in one lane as much as possible. Do not weave in and out of traffic. Last minute lane or direction changes may increase the risk of collisions. Once you start moving through an intersection, keep going. If you start to make a turn, follow through. If you miss a turn, keep driving until you can safely and legally turn around.
Types of Lanes
Passing Lanes
On a multilane road, the passing lane (far left lane) is the lane closest to the center divider and is used to pass other vehicles.
Carpool/High-Occupancy Vehicle (HOV) Lanes
An HOV lane is a special lane reserved for carpools, buses, motorcycles, or low-emission vehicles with decals. To use an HOV lane, one of these must apply:
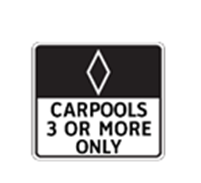
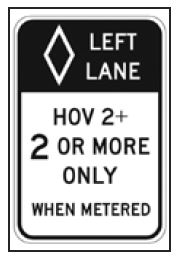
- You have a certain number of people in your vehicle. There will be signs at the on-ramp or along the road to tell you the minimum number of people. Road signs also list the hours when the HOV rules apply.
- You are driving a low emission or zero emission vehicle. You must display a special DMV-issued decal.
- You are riding a motorcycle (unless otherwise posted).
The road surface in a HOV lane is marked with a diamond symbol and the words Carpool Lane. Do not cross over double solid lines to enter or exit an HOV lane. Use designated entrances and exits.
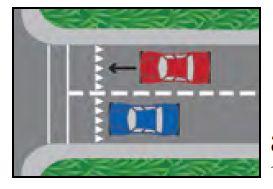
Center Left Turn Lanes
A center left turn lane is located in the middle of a two-way street. It is marked on both sides by two painted lines. The inner line is broken and the outer line is solid. Use the center left turn lane to prepare for and make a left turn or U-turn. It is not a regular traffic lane or passing lane. You may only drive for 200 feet in the center left turn lane. To turn left from this lane:
- Look for other vehicles coming toward you in the center left turn lane.
- Signal.
- Look over your shoulder to check your blind spots.
- Merge completely into the center left turn lane so you do not block traffic.
- Turn when it is safe.
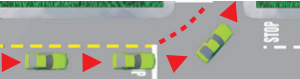
Turnout Areas or Lanes
Some two-lane roads have special turnout areas or lanes. Merge into these areas or lanes to allow cars behind you to pass.
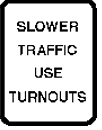
You must use a turnout area or lane to let other vehicles pass when you are driving slowly on a two-lane road, where passing is unsafe, and there are five or more vehicles following you.
Bicycle Lanes
Bicycle lanes are for bicyclists only and run alongside vehicle traffic. They are typically marked by a single solid white line and signs. They are sometimes painted bright green to make them easier to see.
It is illegal to drive in a bicycle lane unless you are:
- Parking (where permitted).
- Entering or leaving the road.
- Turning (within 200 feet of an intersection).
There are multiple types of bike lanes and markings:
- Bike lane: Established along streets adjacent to vehicle traffic. Typically marked by a single solid white line that turns into a dash-line near an intersection.
- Buffered bike lane: Uses chevrons or diagonal markings to provide greater separation from traffic and on-street parking.
- Bike route: Uses bike route signs and shared road markings to designate a preferred route for bicyclists on streets shared with vehicle traffic.
- Bicycle boulevard: Prioritizes bicycle travel on streets shared with vehicle traffic.
- Separated bikeway: Is physically separated from motor vehicle traffic and for exclusive use of bicyclists. They are also known as a cycle track or protected bike lanes. The separation may include flexible posts, grade separation, inflexible barriers, or on-street parking.
- Shared roadway bicycle markings: Alert drivers that bicyclists can occupy the lane and help bicyclists maintain a safe lane position in traffic.
Note Check your blind spots before entering a bike lane. If you drive a motorized bicycle, use caution to avoid other bicyclists. Travel at a reasonable speed and do not endanger the safety of other bicyclists.
Turns
Right Turns
To make a right turn:
- Drive close to the right edge of the road.
- If a designated right turn lane is available, enter at the opening.
- You can drive in a bike lane within 200 feet from the turn. Check for bicyclists in your blind spots.
- Watch for pedestrians, bicyclists, or motorcyclists between your vehicle and the curb.
- Start signaling about 100 feet before the turn.
- Look over your right shoulder and reduce your speed.
- Stop behind the limit line. A limit line is a wide white line that shows the drivers where to stop before an intersection or crosswalk. If there is no limit line, stop before you enter the crosswalk. If there is no crosswalk, stop before you enter the intersection.
- Look both ways (left-right-left) and turn when it is safe.
- Complete your turn in the right lane. Do not turn wide into another lane.
Right Turn Against a Red Light
You may turn right at a red light after a complete stop unless there is a No Turn on Red sign. Follow the same steps listed above for right turns.
Right Turn Against a Red Arrow
You may not turn right if you are stopped at a red arrow light. Wait until the light changes to green before making your turn.
Right Turn at a Public Transit Bus Lane
It is illegal to drive, stop, park, or leave a vehicle in an area designated for public transit buses. Signs will be posted to indicate the lanes are for bus only use. However, you may cross a bus lane to make a right turn.
Right Turn onto a Road with a Dedicated Lane
A dedicated right turn lane does not merge into another lane and allows you to make a right turn without stopping. You may make your turn even if there is a red light for vehicles going straight through the intersection. If there is a traffic light or sign on the right curb of the right turn lane, you must obey that light or sign. Always yield to pedestrians in a crosswalk when turning.
Left Turns
To turn left:
- Drive close to the center divider or into the left turn lane.
- Enter a designated left turn lane at the opening. Do not cross any solid line.
- Enter a two-way center left turn lane within 200 feet of the turn. Respect the right-of-way of any vehicle, bicyclist, or motorcyclist already in the lane. Always yield to pedestrians.
- Start signaling 100 feet before the turn.
- Look over your left shoulder and reduce your speed.
- Stop behind the limit line. If there is no limit line, stop before you enter the crosswalk. If there is no crosswalk, stop before you enter the intersection.
- Look both ways (left-right-left) and begin your turn when it is safe.
- Proceed into the intersection while turning to complete your turn in the left lane.
- Do not turn the steering wheel too soon and enter the lane of oncoming vehicles.
- Keep your wheels pointed straight ahead until it is safe to start your turn. If your wheels are pointed to the left and a vehicle hits you from behind, you could be pushed into oncoming traffic.
- Accelerate smoothly during and after the turn.
- Allow the steering wheel to straighten in the new lane.
Left Turn Against a Red Light
You may turn left against a red light when you are turning from a one-way street onto a one-way street. Make sure there is no sign prohibiting the turn. Yield to other vehicles, pedestrians, or bicyclists who have a green light. Look both ways and turn when it is safe.
U-TURN
A U-turn is when you turn your vehicle around to go back in the direction you came. To make a U-turn, signal and use the left turn lane or far-left lane. You may make a U-turn:
- Across a double yellow line.
- In a residential district if no vehicles are approaching you within 200 feet.
- At an intersection on a green traffic light or green arrow, unless a NO U-TURN sign is posted.
- On a divided highway if a center divider opening is provided.
Never make a U-turn:
- Where a NO U-TURN sign is posted.
- At or on a railroad crossing.
- On a divided highway by crossing a dividing section, curb, strip of land, or two sets of double yellow lines.
- When you cannot see clearly for 200 feet in each direction.
- On a one-way street.
- In front of a fire station. Never use a fire station driveway to turn around.
- In business districts (the part of a city or town where most offices and businesses are).
- Except at an intersection, or on a divided highway where an opening has been provided.
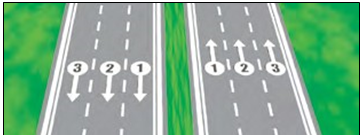
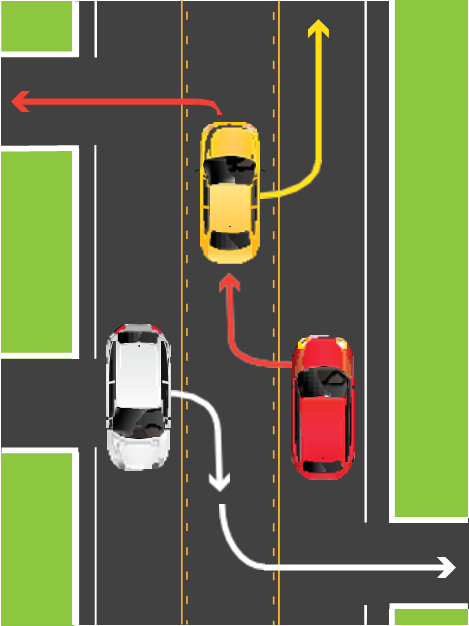
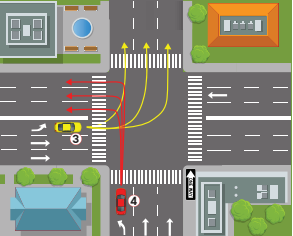
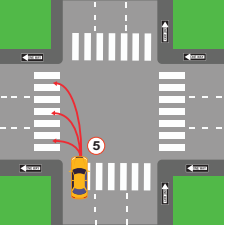
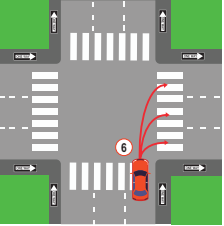
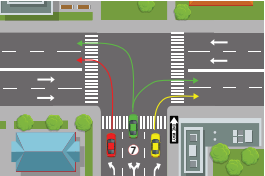
Examples of Turns
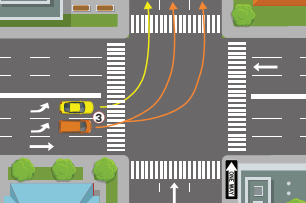
The descriptions below refer to the numbers next to the cars in the images. Watch for pedestrians, motorcycles, and bicycles between your vehicle and the curb. When making turns, there may be signs or arrows that indicate you can turn from or end in more than one lane.
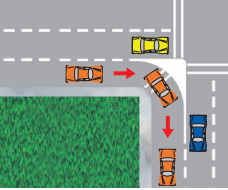
- Left turn from a two-way street. Start the turn in the left lane closest to the middle of the street. To reduce the risk of collision, end the turn in the left lane closest to the middle of the street going in your vehicle’s direction.
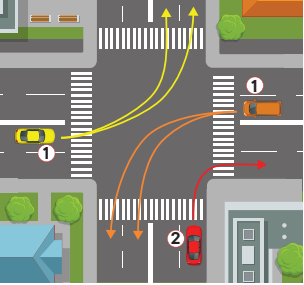
2. Right turn. Begin and end the turn in the lane closest to the right edge of the road. Do not swing wide into another lane of traffic.
3. Left turn from a two-way street onto a one-way street. Start the turn from the lane closest to the middle of the street (far-left lane). If there are three or more lanes in your direction of travel, you may end your turn in any lane that is open.
4. Left turn from a one-way street onto a two-way street. Start the turn from the far-left lane. To reduce the risk of collision, end the turn in the left lane closest to the middle of the street going in your vehicle’s direction.
5. Left turn from a one-way street onto a one-way street. Start the turn from the far-left lane. Bicyclists can legally use the left turn lane for their left turns. If there are three or more lanes in your direction of travel, you may end your turn in any lane that is open.
6. Right turn from a one-way street onto a one-way street. Start the turn in the far-right lane. If safe, you may end the turn in any lane.
7. Turn at a “T” intersection from a one-way street onto a two-way street. Traffic going straight through the intersection has the right-of-way. You may turn either right or left from the center lane.
Braking
- Remove your foot from the accelerator and allow the vehicle to slow down. Lightly press the brake until you come to a full stop. Give yourself enough space and time to perform this maneuver.
- When stopping at a limit line, do not cross over the line. If stopping behind a vehicle, leave enough space to see their rear wheels.
Merging And Exiting
Merging
Highway traffic has the right-of-way. For more information, see Right-of-Way Rules: Who Goes First in Section 7. When you enter a highway, you will need to:
- Be in the proper lane on the on-ramp.
- Be at or near the speed of traffic.
- Merge into highway traffic when safe to do so. Do not stop unless absolutely necessary.
- Merge into a space large enough for your vehicle to safely join the lane.
- Use your mirrors and turn signals.
- Turn your head quickly to look over your shoulder before changing lanes or merging into traffic.
- Make sure you can stop safely by leaving three seconds of space between you and the vehicle in front of you.
- Make sure you do not cross over any solid lines when merging. If you need to cross several lanes, signal and cross them one at a time. Check your blind spots for vehicles, motorcyclists, bicyclists, and pedestrians each time.
Exiting
To exit a highway safely:
- Know your exit and be aware of when it is approaching.
- If you plan to change lanes, do so one at a time. Signal and look over your shoulder to check your blind spots.
- When in the proper lane, signal five seconds (approximately 400 feet) before you exit.
- Make sure you are at a safe speed to exit.
- Do not cross over any solid lines when exiting.
Crossing or Entering Traffic
When entering traffic from a full stop, signal and leave a large enough space to get up to the speed of traffic. To merge, enter, or exit traffic, you need a space that is:
- Half a block on city streets, which is about 150 feet.
- A full block on the highway, which is about 300 feet.
Even if you have a green light, do not start across the intersection if there are pedestrians or vehicles blocking your pathway.
When turning left, do not assume that an oncoming vehicle with its right turn signal on is turning before it reaches you. The driver may have their signal on by mistake or plan to turn just beyond you. Wait for the vehicle to start its turn before beginning the left turn.
Passing
You must judge whether you have enough space to pass whenever you approach:
- An oncoming vehicle or bicyclist.
- A hill, curve, intersection, or road obstruction. To safely pass, the hill or curve should be at least one-third of a mile ahead.
Before you pass, look ahead for road conditions that may cause other vehicles to move into your lane.
Do not pass:
- If you are approaching a hill or curve and cannot see if other traffic is approaching. This is very dangerous on one and two lane roads.
- Within 100 feet of an intersection, bridge, tunnel, railroad crossing, or other hazardous area.
- At crossroads and driveways.
- Unless you have enough space to return to your lane.
How to Pass
When you are going to pass on an open highway:
- Signal that you plan on passing.
- Look over your shoulder to check your blind spots.
- Drive into the passing lane.
- Speed up to pass the vehicle.
- Signal and return to your original lane.
You may pass on the right only when:
- An open highway has two or more lanes going in your direction.
- The driver ahead of you is turning left and you can safely pass on the right. Never pass on the left if the driver is signaling a left turn.
- You are on a one-way street.
Never drive off the paved or main-traveled part of the road to pass.
Being Passed
If a vehicle is passing you or signals that they plan on passing, allow the vehicle to pass. Maintain your lane position and your speed.
Section 3: The Testing Process
Driver’s License Tests
Here is an overview of the driver’s license tests:
-
Vision Test
DMV tests all applicants to ensure they can see well enough to drive safely. If you take your vision test with corrective or contact lenses, your driver’s license will have a corrective lenses restriction. If you do not pass your vision test, you will be asked to have your eye doctor complete a Report of Vision Examination (DL 62) form. For more information, visit dmv.ca.gov/vision-standards.
-
Knowledge Test
When you apply for an original driver’s license, you must pass a knowledge test with multiple choice questions. You are allowed three attempts to pass before you must reapply. Minors must wait seven days to retake a failed knowledge test, not including the day of the failure.
When renewing your driver’s license, eLearning may be an alternative testing option. This is a no-fail, self-paced interactive modulated course with quizzes after each module. The course can be taken on a computer, laptop, tablet, or mobile device.
Testing options will be available once you complete your application at dmv.ca.gov/dl.
Important You are not allowed to use any testing aids during knowledge tests, such as a California Driver’s Handbook or cell phone.
-
Behind-the-Wheel Drive Test
When you apply for an original driver’s license, you will be tested on your ability to safely drive a vehicle. Upon renewal, drivers with a vision or medical condition may be required to take a behind-the-wheel test. The examiner may give two or more instructions at one time to determine whether you can understand and properly follow both directions. For example, “At the next street, make a left turn, and then at the first intersection make another left turn.”
Visit dmv.ca.gov/make-an-appointment to schedule a behind-the-wheel drive test appointment.
On the day of your behind-the-wheel test, you must bring:
- Your instruction permit or driver’s license (if you have one).
- Another California-licensed driver who is at least 18 years old (25 for minors), unless you are already licensed to drive.
- A vehicle that is safe to drive for your test.
- Valid proof of insurance and vehicle registration.
- If you plan to use a rental vehicle for your drive test, your name must be listed on the rental contract. The contract must not exclude behind-the-wheel drive tests.
Note Minors must wait 14 days to retake a failed behind-the-wheel drive test, not including the day of the failure.
Before you begin, the DMV examiner will ask you to locate and demonstrate the following:
- Driver window – The window on the driver side must open.
- Windshield – The windshield must allow a full, clear, unblocked view for you and the DMV examiner. Windshield cracks may postpone your test.
- Rear-view mirrors – At least two rearview mirrors. One of them must be on the left side of your vehicle.
- Brake lights – The right and left brake lights must be operational.
- Tires – The tires must have at least 1/32-inch of uniformed tread depth. The use of a donut tire is not allowed during a drive test.
- Foot brake – There must be at least one inch of clearance between the bottom of the brake pedal and the floorboard when depressed.
- Horn – Designed for the vehicle, in proper working condition, and loud enough to be heard from a distance of at least 200 feet.
- Emergency (parking brake) – How to set and release the parking brake.
- Turn/Arm signals
- Left turn.
- Right turn.
- Slowing down or stopping.
- Windshield wipers: control arm or switch – You may be required to show they function.
- Seat belts – All seat belts must work properly and be used by the individual(s) in the vehicle.
Note If your vehicle does not meet the requirements, your drive test will be rescheduled.
Interpreters may be used during the pre-drive inspection for the identification and use of certain controls in the vehicle but may not accompany you during the drive test.
Only the examiner is allowed to accompany you during the drive test. Exceptions are made for training, service animals, and certain law enforcement situations.
The use of a recording device, including a video/audio recorder, is prohibited during a behind-the-wheel drive test. If the recording device cannot be powered off or disabled, the applicant must block it so there is no visual or audio recording during the drive test.
Other Things to Know for Your Behind-the-Wheel Test
The drive test is intended to determine your skill in operating a motor vehicle in most road situations and evaluate your abilities, not the vehicle’s technology. Therefore, advanced driver assistance systems technologies, such as automated parallel parking, lane departure, and adaptive cruise control, are not permitted during the drive test. Vehicle safety technology, such as backup cameras and blind spot monitors, may be used on the drive test, but are not a replacement for an actual visual check of your mirrors and blind spots.
To view a sample of the Driving Performance Evaluation (DPE) Score Sheet, visit dmv.ca.gov/teendrivers. For a sample of the Supplemental/Area DPE Score Sheet, visit dmv.ca.gov/seniors.
Section 1: The California Driver’s License
A California driver’s license allows you to drive on public roads.
Before you can get a driver’s license in California, you are required to pass the knowledge and behind-the-wheel drive tests based on information in this handbook.
You must have the correct license to drive your vehicle type. Most people need a noncommercial Class C driver’s license. To operate commercial vehicles, motorcycles, and other types of vehicles, you must have a different class of license.
For information on vehicles covered by a Class C, visit dmv.ca.gov/dl.
Card Designations
REAL ID Driver’s License
Beginning May 2025, your driver’s license or identification (ID) card must be REAL ID compliant if you use it to:
- Board an airplane for domestic flights.
- Enter military bases.
- Enter most federal facilities.
Visit dmv.ca.gov/realid to learn more about applying for a REAL ID.
Driver’s Licenses for Undocumented Residents
California offers driver’s licenses for all residents regardless of immigration status. For more information, visit dmv.ca.gov/dl.
Organ and Tissue Donor
For information, visit donateLIFEcalifornia.org.
Veterans
Visit dmv.ca.gov/veterans to learn more about the requirements and benefits of a Veteran designation.
ID Cards
ID cards are issued for identification purposes to eligible persons of any age. They do not permit you to drive. To get an ID, you must provide your identity document, residency documents, and social security number.
Visit dmv.ca.gov/id-cards to complete an ID card application and get information on current acceptable documents and reduced-fee, no-fee, or senior ID cards.
Section 11: Vehicle Registration Requirements
You need to register your vehicle in California to use it in the state. For more information, visit dmv.ca.gov/vrservices.
Buying or Selling a Vehicle
When you buy a vehicle, you have 10 days to transfer ownership to your name.
When you sell a vehicle, you must notify DMV within five days by completing a Notice of Transfer and Release of Liability at dmv.ca.gov/nrl.
Out-of-State Vehicles
You have 20 days to register your vehicle after you become a resident or get a job in California. For more information, visit dmv.ca.gov/outofstatevr.
All vehicles registered in California are required to meet California requirements including vehicle emission controls in support of California’s clean air standards. DMV cannot register a vehicle if it does not qualify.
Section 10: Financial Responsibility, Insurance Requirements, and Collisions
You must have your proof of financial responsibility (insurance) when you drive and for a drive test. If you get into a collision, you must show proof to the other drivers involved in the collision.
Insurance Requirements
Your insurance must cover at least:
- $30,000 for a single death or injury.
- $60,000 for death or injury to more than one person.
- $15,000 for property damage.
Parents or guardians take on financial responsibility for drivers younger than 18 years old and pay for damages if the driver is involved in a collision. Drivers who are 18 years old and older take on their own financial responsibility.
Before you buy insurance, make sure that the agent, broker, or insurance provider is licensed by the California Department of Insurance. For more information, visit insurance.ca.gov/license-status/.
Driving Without Insurance
Your driving privilege will be suspended for up to four years if you are in a collision and do not have proper insurance coverage. It does not matter who was at fault.
You can get your driver’s license back during the last three years of the suspension if you provide a California Insurance Proof Certificate (SR 22/SR 1P) and maintain it during the three-year period.
Low-cost Insurance
If you cannot afford liability insurance, you may be eligible for the California Low Cost Automobile Insurance Program. For more information, visit mylowcostauto.com or call 1-866-602-8861.
Collisions
Understand factors that lead to collisions so you can try to avoid them.
Causes of Collisions
The most common causes of collisions are:
- Driver distractions.
- Unsafe speed.
- Improper turns.
- Not following the right-of-way rules.
- Not following stop signals and signs.
- Driving on the wrong side of the road.
- A vehicle traveling faster or slower than the flow of traffic.
If you see a vehicle’s emergency flashers ahead, slow down. There may be a collision or other road emergency. Pass carefully.
Avoid driving near collisions, if possible. If anyone is injured, they will get help faster if other vehicles are not blocking the road.
What to Do if You Are in a Collision
- If you are in a collision:
- You must stop. Someone could be injured and need your help. Failing to stop or leaving the scene of an accident is called a hit-and-run. The punishment is severe if you are convicted of a hit-and-run.
- Call 911 right away if anyone is hurt.
- Move your vehicle out of traffic if no one is hurt. Then call 911.
- Show your driver’s license, vehicle registration card, insurance information, and current address to the other driver, law enforcement officer, and anyone else involved in the collision.
- You must make a report to law enforcement within 24 hours of the collision if anyone is injured or killed. Your insurance agent, broker, or legal representative can also file the report.
- Try to find the owner if your vehicle hits or rolls into a parked car or other property. If you cannot find the owner, leave a note with your name, phone number, and address. Securely attach the note to the vehicle or property. Report the collision to law enforcement.
- If you kill or injure an animal, call the nearest humane society or law enforcement. Do not try to move an injured animal.
Reporting a Collision
If you are in a collision, you must report it to DMV within 10 days if:
- The collision caused more than $1,000 in damage to property.
- Anyone was injured or killed. This applies even if the injuries were minor.
Each driver must file a Report of Traffic Accident Occurring in California (SR 1) with DMV at dmv.ca.gov/accidentreport. You (or your representative) must file a report whether or not you caused the collision. This applies even if the collision happened on private property.
Your driving privilege will be suspended if you fail to file a report. Law enforcement will not make a report for you.
Collisions on Your Driver’s Record
If you are involved in a collision resulting in $1,000 in damage, or where anyone is injured or dies, it is your responsibility to report the collision to DMV. DMV will add it to your driver’s record. It does not matter who caused the collision.
Section 8: Safe Driving (Continued)
Manage Your Speed
In California, you may never drive faster than is safe for the current road conditions. This is known as the Basic Speed Law.
Make sure you manage your speed and slow down when conditions call for it. Regardless of the posted speed limit, your speed should depend on:
- The number of vehicles on the road.
- The speed of other vehicles on the road.
- The road surface: smooth, rough, graveled, wet, dry, wide, or narrow.
- Bicyclists or pedestrians on or crossing the road.
- Weather: rain, fog, snow, wind, or dust.
- Traffic congestion: small changes in your driving habits can help reduce congestion. Avoid weaving in and out of freeway lanes.
There are also situations with specific speed limit laws and conditions where you should reduce your speed. Unless otherwise posted, the ideal maximum speed limit on most California highways is 65 mph. It is 55 mph on a two-lane undivided highway and for vehicles towing trailers.
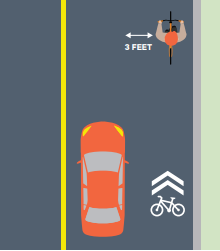
Choose Between Hazards
Sometimes dangers will be on both sides of the road at the same time. For example, parked cars to the right and oncoming cars to the left.
If one danger is greater than the other, give more space to the most dangerous situation. Suppose you are on a two-lane road with an oncoming vehicle to the left and a bicyclist ahead to your right. Instead of driving between the vehicle and the bicyclist, take one danger at a time. Slow down and let the oncoming vehicle pass. When the vehicle has passed, move to the left to allow plenty of space (at least three feet) to pass the bicyclist. If there is a steady flow of oncoming vehicles, use as much of the left lane as you safely can to pass the bicyclist.
Know How to Handle Emergencies
There are many types of emergencies you may encounter when you drive. Knowing how to handle emergencies can help keep you safe.
Tire Blowout
If you have a tire blowout, do not panic or overreact. Suddenly braking or abruptly removing your foot from the accelerator can result in a loss of control over the vehicle. Instead, you should take the following steps recommended by the National Highway Traffic Safety Administration:
- Hold the steering wheel with both hands.
- Maintain your vehicle speed if possible and safe.
- Gradually release the accelerator.
- Correct the steering as necessary to stabilize your vehicle and regain control.
- Look and steer in the direction you want your vehicle to go.
- Once your vehicle has stabilized, continue to slow down and pull off the road where and when it’s safe.
Driving Off the Pavement
If your wheels drift off the pavement:
- Grip the steering wheel firmly.
- Remove your foot from the accelerator.
- Brake gently.
- Check for traffic behind you.
- Carefully steer back onto the pavement.
Do not pull or turn your steering wheel with too much force. This may cause you to drive into oncoming traffic.
Overheating Conditions
In extreme heat, you should:
- Watch the temperature gauge.
- Avoid driving at high speeds for long periods.
- Turn off the air conditioner.
In extreme cold, you should:
- Watch the temperature gauge. The engine may not have the correct level of antifreeze.
- Use the defroster or slightly open your windows to keep them from fogging up.
Note See the vehicle owner’s manual for more information.
If Your Vehicle Becomes Disabled on the Freeway
If your vehicle stops working on the freeway:
- Safely pull over to the right shoulder.
- Exit on the right side so you are away from traffic if you must get out of the vehicle.
- Dial 511 from your cell phone or locate call box for assistance..
- Return to your vehicle as soon as you can. Get back into the vehicle from the right side (away from traffic).
- Stay inside your vehicle with your seat belt on until help arrives.
- Use your emergency flashers at your discretion. They can help other vehicles see you at night and in different weather conditions.
There are certain circumstances where it is safer to get out of your vehicle and stay away. These include situations where there is:
- Not enough space on the shoulder.
- A guardrail.
- An area for you to safely stay away from freeway lanes.
California Highway Patrol (CHP) Freeway Service Patrol (FSP)
During commute times, the CHP FSP provides free emergency roadside services in certain areas. If you get stuck on the freeway because your vehicle stops running, FSP will:
- Provide a gallon of gas if you run out.
- Jump start your vehicle if the battery is dead.
- Refill your radiator and tape hoses.
- Change a flat tire.
- Report a collision to CHP.
If FSP cannot start your vehicle, they will have it towed (free of charge) to a CHP-approved location. CHP will notify an auto club or towing service.
FSP will not:
- Tow your vehicle to a private repair service or residence.
- Recommend tow service companies or repair and body shops.
- Tow motorcycles.
- Help vehicles which have been involved in a collision, unless they are directed to by CHP.
Call 511 for FSP information and assistance.
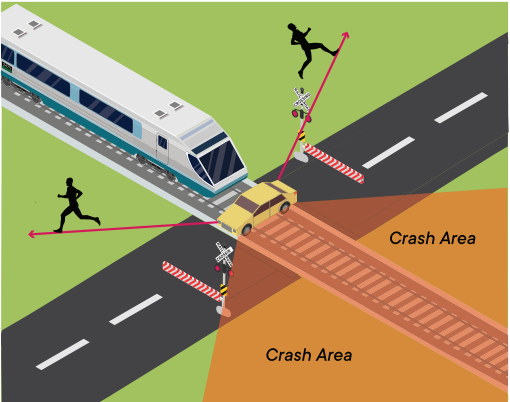
Disabled Vehicles on Railroad Tracks
If your vehicle stalls or stops while blocking part of a train track with a train approaching and warning lights flashing:
- Immediately exit your vehicle. Run away from the tracks diagonally in the direction the train is coming from. Then call 911.
If you do not see a train approaching and warning lights are not flashing:
- Exit your vehicle. Dial the number located on the railroad crossing posts or metal control box near the tracks. Provide the crossing number (if posted). Tell them a vehicle is on the tracks. Then call 911.
Do Not Drive Distracted
Avoid distractions while you drive. Some common distractions are:
- Looking at a phone, navigation system, children, and pets.
- Changing music or volume.
- Applying makeup or shaving.
Cell Phones and Texting
Cell phones are the main source of distracted driving. Driving while using a handheld cell phone is unsafe and illegal.
Adult drivers should only use a cell phone in hands-free mode when necessary.
- Do not answer your cell phone if it rings. Let the call go to voicemail. If you must return or make a call, pull safely off the road.
- Do not send or read text messages or emails while driving.
- Mount your cell phone on the windshield, dashboard, or center console. It cannot block your view of the road.
- Use the single swipe or touch feature on the mounted cell phone.
Minors And Cell Phones
It is against the law for a minor to use a cell phone or electronic wireless device to answer calls and send or respond to text messages while driving.
EXCEPTION: Minors may use a cell phone to make a call for emergency assistance.
Be Familiar with New Technology
The technology in vehicles is always advancing. We will see more self-driving vehicles and vehicles with advanced driver assistance systems (ADAS) on the road. Vehicles with these systems may respond to road situations differently than a human driver would.
Be Aware of Carbon Monoxide
All gas-powered vehicles produce carbon monoxide. Carbon monoxide is a deadly odorless gas released from a vehicle’s exhaust pipe. Never start your vehicle inside the garage with the door closed. Symptoms of carbon monoxide poisoning include:
- Tiredness
- Yawning
- Dizziness
- Nausea
- Headache
- Ringing in the ears
If you are experiencing any of these symptoms, have your exhaust system checked.
Section 8: Safe Driving (Continued)
Protect Yourself and Your Passengers
Seat Belts
You and your passengers must wear seat belts. You can get a ticket if you do not. If your passenger is under 16 years old, you can also get a ticket if they are not wearing their seat belt.
Wearing the lap belt and shoulder harness of a seat belt will increase your chance of survival in most types of collisions. This image shows what can happen in a collision.
When you are in a collision, your vehicle stops. But you keep moving at the same speed you were traveling. You only stop when you hit the dashboard or windshield. If you are struck from the side, the impact could push you back and forth across the seat. Seat and shoulder belts keep you in a better position to control the vehicle. They may also minimize serious injuries.
It is important to wear the seat belt correctly to avoid injury or death:
- Wear the shoulder harness across your shoulder and chest. There should be little to no slack. Do not wear the shoulder belt under your arm or behind your back.
- Adjust the lap belt so that it is snug and lies low across your hips. Otherwise you might slide out of the belt in a crash.
- If you are pregnant, wear the lap belt as low as possible under your abdomen. Place the shoulder strap between your breasts and to the side of your abdomen’s bulge.

IMPACT – If the red arrow were another car hitting your car on the driver’s side:
- You would first be thrown against the driver’s side door,
- Then you would “rebound” and be thrown toward the passenger’s side door.
Child Restraint System and Safety Seats
You must secure children with a federally-approved child passenger restraint system or safety belt. The requirements depend on the child’s height and age.
- Children who are under 2 years old, under 40 pounds, and under 3 feet 4 inches tall: Secure in a rear-facing child passenger restraint system.
Note A child in a rear-facing child passenger restraint system may not ride in the front seat of an airbag-equipped vehicle.
- Children who are under 8 years old, or who are less than 4 feet 9 inches tall: Secure in a child passenger restraint system in a rear seat. In some cases, children under 8 years old may ride in the front seat of a vehicle in a federally-approved child passenger restraint system. They may ride in the front seat if:
- There is no rear seat.
- The rear seats are side-facing jump seats.
- The rear seats are rear-facing seats.
- The child passenger restraint system cannot be installed properly in the rear seat.
- All rear seats are already occupied by children 7 years old or younger.
- Medical reasons prevent the child from riding in the back seat.
- Children who are 8 years old or older, or at least 4 feet 9 inches tall: May use a properly secured safety belt that meets federal standards.
Your local law enforcement agency or fire department can check the installation of your child passenger restraint system. As your child grows, check that the child passenger restraint system is the right size.
Air Bags
Air bags are a valuable safety feature on many vehicles. They can help keep you safer than a seat belt alone.
Ride at least 10 inches from the airbag cover, as long as you can maintain full control of your vehicle. Measure from the center of the steering wheel to your breastbone. Contact your vehicle dealer or manufacturer if you cannot safely sit 10 inches away from the air bag. They may have advice about additional ways to move back from your air bag. Passengers should also sit at least 10 inches away from the passenger-side air bag.
Note Children seated next to a side air bag may be at risk of serious or fatal injury.
Unattended Children and Pets
It is illegal to leave a child who is six years old or younger unattended in a vehicle. A child may be left under the supervision of a person who is at least 12 years old.
It is dangerous and illegal to leave children or animals in a hot vehicle. The temperature inside a parked vehicle can rise rapidly when it is sitting in the sun. This is true even if a window is left slightly open. Too much exposure to heat can lead to dehydration, heat stroke, and death.
Section 5: An Introduction to Driving
Your health may affect your driving.
Vision – You must be able to notice hazards in different types of lighting, judge distances, adjust to traffic speed, and read road signs.
Hearing – You must be able to hear horns, sirens, motorcycles, or screeching tires that may alert you of hazards. It is illegal to wear a headset or earplugs in both ears while driving.
Fatigue and Drowsiness – Can affect your vision and increase reaction time to hazards.
Physical and Mental – You must be alert to quickly decide the correct course of action in any type of traffic situation, including unexpected ones.
Medications – Prescription and over-the-counter medications can make you an unsafe driver. Some medicines can make you sleepy. It is your responsibility to know the effects of the medications you take.
Health – Physicians are required to report patients, who are at least 14 years old, to DMV for medical conditions that may affect your ability to drive safely, such as lapse of consciousness.
Controlling the Vehicle
To control your vehicle, it is critical to keep both hands on the wheel whenever possible.
Hand-to-Hand Steering (Push/Pull)
To use this steering wheel method:
- Start with your hands at 9 and 3 o’clock or 8 and 4 o’clock.
- Do not cross your hands over the middle of the steering wheel.
- Keep your hands in these positions, even when making turns.
Hand-Over-Hand Steering
Use this steering wheel method when you turn at low speeds, park, or need to recover from a skid. To use this method:
- Start with your hands at 8 and 4 o’clock.
- Reach across the steering wheel to grasp the opposite side.
- Let go of the steering wheel with your other hand.
- Reach across the arm still holding the wheel, grip the wheel, and pull up.
One-Hand Steering
There are only two situations that may require steering with one hand:
- When you are turning while backing up to see where you are going behind you. Place your hand at the 12 o’clock position on the steering wheel.
- When you are operating vehicle controls that require you to remove a hand from the steering wheel.
Signals, Horns, And Headlights
Your signals, horn, and headlights are important for communicating with other drivers, pedestrians, and bicyclists.
Signaling
Always signal when you turn, change lanes, slow down, or stop.
You can signal using your vehicle’s signal lights or using hand-and-arm positions. If your signal lights are not functioning, or bright sunlight makes your signal lights hard to see, use the hand-and-arm signals shown in the image below.
| LEFT TURN | RIGHT TURN | SLOW OR STOP |
|---|---|---|
LEFT TURN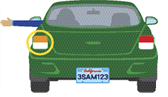 | RIGHT TURN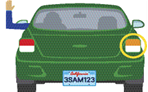 | SLOW OR STOP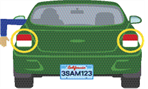 |
Bicyclists may signal a turn with their arm held straight out, pointing in the direction they plan to turn.
You should signal:
- At least 100 feet before you turn.
- Before every lane change.
- At least five seconds before you change lanes on a freeway.
- Before pulling next to the curb or away from the curb.
- Even when you do not see other vehicles around you.
- When you are almost through the intersection if you plan to turn shortly after crossing the intersection.
Remember to turn off your signal when you no longer need it.
Using Your Horn
Use your vehicle’s horn to let other drivers know you are there or warn others of a hazard. Use your horn to:
- Avoid collisions.
- Alert oncoming traffic on narrow mountain roads where you cannot see at least 200 feet ahead.
Using Your Headlights
Your vehicle’s headlights help you see what is in front of you. They also make it easier for other drivers to see your vehicle. Dim your high-beam headlights to low beams within 500 feet of a vehicle coming toward you or within 300 feet of a vehicle you are following. It is illegal to drive using only parking lights. Use your headlights:
- When it is too dark to see from 1,000 feet away.
- Beginning 30 minutes after sunset.
- Until 30 minutes before sunrise.
- In adverse weather. If you need to use your windshield wipers due to fog, rain, or snow, you must turn on your low-beam headlights.
- When conditions (such as clouds, dust, smoke, or fog) prevent you from seeing other vehicles.
- On mountain roads and tunnels (even on sunny days).
- When a road sign states that headlights must be on.
- To help other drivers see your vehicle, especially when the sun is low on the horizon.
Using Your Emergency Flashers
If you can see a collision or hazard ahead, warn drivers behind you using these methods:
- Turn on your emergency flashers.
- Lightly tap your brake pedal three or four times.
- Use a hand signal when slowing and stopping.
If you need to stop because of vehicle trouble:
- Turn on your emergency flashers. If your vehicle does not have emergency flashers, use your turn signals.
- If possible, pull off the road away from all traffic.
- If you cannot get completely off the road, stop where people can see you and your vehicle from behind.
- Do not stop just over a hill or just around a curve. Other drivers may not see your vehicle in time to avoid a collision.
- Call for emergency roadside assistance and stay in your vehicle until help arrives.
Section 2: Getting an Instruction Permit and Driver’s License
If you do not have a driver’s license from California or another state, you must apply for an instruction permit before taking the behind-the-wheel drive test to get your driver’s license.
What You Need
To apply for an instruction permit or driver’s license, you must provide:
- Proof of identity: Proving who you are.
- Two proofs of residency: Proving you live in California. Exceptions may apply.
- Legal full name document: Proving your current name if the name on your identity document and application do not match.
- Social security number: Exceptions may apply.
For REAL ID requirements, current acceptable documents, and eligibility, visit dmv.ca.gov/realid.
Register To Vote
For information on registering to vote, visit California Secretary of State at sos.ca.gov.
Applying For An Instruction Permit
To apply for a Class C instruction permit:
- Complete a Driver’s License & ID Card Application.
- Provide your documents.
- Pay a non-refundable application fee.
- Pass your knowledge test(s).
- Pass a vision test.
For more information, visit dmv.ca.gov/instructionpermit for a complete list of application steps and requirements.
If you are under 18 years old, you will also need to:
- Be at least 15½ years old.
- Complete a driver education program.
- Have a parent or guardian sign to approve the application and accept financial responsibility (see Section 10). If your parents or guardians share joint custody of you, both must sign.
- Wait to use your instruction permit until you start behind-the-wheel driver training with an instructor who will validate the permit.
Driving Schools
Driver education and driver training are offered at DMV-licensed driving schools and some high schools. Instructors must carry an instructor’s ID card. Ask to see it.
See the Driver Training Schools page at dmv.ca.gov/driver-ed for more information about selecting a driving school.
Applying For A Driver’s License
To get your driver’s license after you have your instruction permit, you need to:
- Practice driving with a California-licensed driver who is at least 18 years old (25 for minors). This person must sit close enough to take control of the vehicle if needed.
- Pass a behind-the-wheel drive test.
If you are under 18 years old, you will also need to:
- Be at least 16 years old.
- Have an instruction permit from California or another state for at least 6 months (or turn 18 years old) before scheduling your behind-the-wheel drive test.
- Prove that you completed both driver education and driver training.
- Practice driving for at least 50 hours with a California-licensed driver who is at least 25 years old. Ten hours must be at night.
See the Driver’s Licenses page at dmv.ca.gov/teendriver for the complete list of application steps, requirements, the Parent Teen Driving Contract, and Driving Performance Evaluation (DPE) Score Sheet.
Minor’s Restrictions and Exceptions
When you are under 18 years old, your driver’s license will have the word provisional. As a provisional driver, you cannot drive:
- Between 11 p.m. and 5 a.m. during the first 12 months you have your license.
- With passengers under 20 years old, unless your parent or guardian or other California-licensed driver (at least 25 years old) rides with you.
- For pay or operate vehicles that require a commercial Class A, B, or C license.
There are exceptions to these restrictions if you:
- Have a medical need and cannot reasonably find another way to travel. You must carry a note signed by your physician. The note must have your medical condition and date you are expected to recover.
- Drive for schooling or a school activity. You must carry a note signed by your school principal, dean, or designee.
- Must drive for work reasons. You must carry a note signed by your employer. The note must confirm your employment.
- Must drive an immediate family member. You must carry a note signed by your parent or legal guardian. The note must state the reason you need to drive, the family member, and date when the need will end.
Note A parent or guardian may cancel their teen’s license by completing a Request for Cancellation or Surrender of a Driver License or ID Card form.
.
Section 4: Changing, Replacing, and Renewing Your Driver’s License
Changes to Your License
If you legally change your name or need an update to your driver’s license, such as your physical description or gender identity, visit dmv.ca.gov/dlservices.
Change Your Address
If you move, you must notify DMV of your new address within ten days. Submit a change of address online at dmv.ca.gov/addresschange or by mail. It is your responsibility to ensure DMV has your correct mailing address on record.
You do not automatically get a new driver’s license when you change your address. You may request a replacement for a fee.
Replace or Renew Your Driver’s License
It is against the law to drive with an expired driver’s license. To renew or replace a lost, stolen, or damaged driver’s license, visit dmv.ca.gov/dlservices. If ineligible to renew online, visit a DMV office.
Before DMV can issue you a driver’s license, you may need to provide additional proof of your identity. Your driver’s license and identity document may expire on the same date. If so, you will be required to provide a valid identity document. If you are a minor, your parent or guardian must sign the application. Once you receive your replacement card, your old card is no longer valid. If you find the old card, destroy it.
Extend Your Driver’s License
If you are out-of-state and cannot renew, you may request a one year extension of your driver’s license. Before your driver’s license expires, submit a request with your name, driver’s license number, birth date, California residence address, and out-of-state address to dl-extensions@dmv.ca.gov.
note Limited-term driver’s licenses are not eligible for this extension.